| 2012 | 2013 | 2015 | 2016 | |
| 2018 | 2019 | 2022 |
Device Mounting: Use a torque wrench to tighten the WPS mounting screw. Do not exceed torque 0.17 Nm (24 in-oz) or you will damage the kinematic mounting surfaces and ruin the absolute calibration of the instrument.
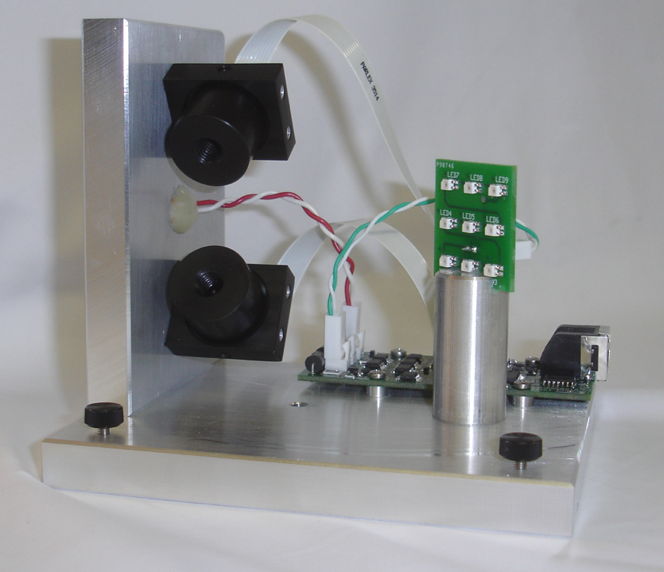
[07-MAY-19] The WPS2 is our Wire Position Sensor, Version Two. Its measures the postion of a stretched wire in the coordinates of the sensor's mounting balls. The WPS2 provides absolute accuracy 5 μm rms and precision of 1 μm rms within its 12 mm × 8 mm dynamic range. Each WPS2 contains two cameras that take pictures of the same section of the same stretched wire from two different angles. Calibration of each camera allows us to determine for each image a plane that contains the center-line of the wire. By intersecting these two planes, we obtain the center-line itself. Thus each camera produces a plane, and each pair of cameras produces a line. We call these planes wire planes, and their intersections are wire lines.

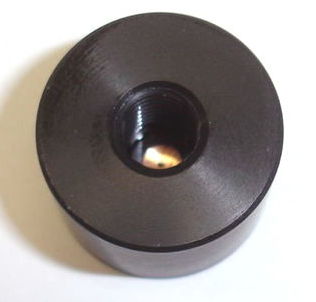
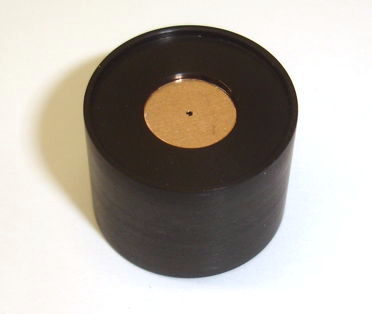
The camera lens is a 6-mm diameter, 9-mm focal length plano-convex 32469. The aperture is a 500-μm hole drilled in a 250-μm thick brass disk. The aperture is pressed against the lens in the manner shown here. The image sensors are the TC255 from Texas Instruments. Illumination comes from an array of nine OVSA1 LEDs, each of which emit roughly 20 mW of 620-nm red light. The WPS Head (A3022) allows simultaneous exposure of both images followed by sequential readout. The circuit also provides two connections for 1-kΩ RTD sensors. The WPS2 provides a single RTD glued to the end wall. The cover is secured in place by two thumb screws, so that the entire device may be mounted upside down.
We obtain wire images from a WPS2 using the WPS Instrument available in the LWDAQ Software. the two images are captured simultaneously, with a single flash of the WPS2's LED array. The result is a combination of two camera images in one tall image, as shown below. The wire is a separate vertical shadow in each camera image. Image analysis finds the center-line of the wire shadow in each camera image.

The WPS2 obtains bright images with a 20-ms exposure and adequate images with a 5-ms exposure. The WPS2-A uses the TC255 image sensor in a 0.3-in ceramic package. The WPS2-B, and all versions of the WPS1, use the TC255P in a 0.4-in plastic package. The WPS2 is almost identical to the WPS1-D. The WPS1 sensor plates were glued in place rather than screwed. The WPS1 used infrared light rather than red light, and its apertures were usually less than 500 μm, which meant it required longer exposure times to obtain a clear image.
The TC255P image sensor has been obsolete for ten years, but small stocks still exist in the United States. We bought enough in 2015 to make dozens of WPS2-Bs. The following versions of the WPS2 exist. All three versions provide similar performance: resolution of 1 μm rms and absolute accuracy 5 μm rms across their field of view.
| Version | Description |
|---|---|
| WPS2-A | TC255 in 0.3" DIP, lens flat side out |
| WPS2-B | TC255P in 0.4" DIP, lens flat side out |
The wire viewed by the WPS2 must be strong and light so that it can be stretched with the minimum of sag. It must be opaque and non-reflecting so the WPS2 cameras can obtain a clear view of its edges. It must not be an insulator, or else charge will build up along its length and electrostatic forces will distort its shape. We manufacture a carbon-impregnated, braided, polymer line to act as the wire for our WPS2 sensors. Our Conducting Polymer Line, part number CPL1, has diameter 480 μm, strength 360 N, and linear density 210 mg/m.

This braided polymer fiber offers the smallest sag at full load possible with any currently-available material. At the same time, it is slightly conductive because of its impregnation with carbon powder. Although the braid is much tougher than metal wire, the impregnated wire must be handled with care, or else the carbon impregnation will be compromised. We can wind the wire onto a spool and unwind it as much as we like, but we must not fold the wire, or allow it to catch upon a sharp poing, nor must we wind it into a radius less than 2 cm. So long as we handle the wire with care, it will maintain its strength, uniformity, and conductivity.
The following table gives the properties of the WPS2 optics.
| Parameter | Value |
|---|---|
| Aperture-CCD Distance | 10.8 mm |
| Aperture Diameter | 500 μm |
| Aperture Centering | ±100 μm |
| Lens Focal Length | 9 mm |
| Lens Diameter | 6 mm |
| Lens Thickness | 1.75 mm |
| CCD Width | 3.4 mm |
| CCD Height | 2.4 mm |
| CCD Pixel Size | 10 μm × 10 μm |
| Field of View | ±150 mrad × ±110 mrad |
| Aperture Height Above End Wall | 15.8 mm |
| Aperture to Front of CCD Mounting Plate | 1.9 mm |
| Exposure Time for Black Wire | 20 ms |
| Depth of Field | 30 mm to 130 mm |
| Relative Precision | 1 μm rms |
| Absolute Accuracy | 5 μm rms |
| Optical Center | (38.0±1.0 mm, 63.5±0.5 mm, −5 mm) |
| Dynamic Range | ±6 mm × ±4 mm |
| Dynamic Range Center | (41.0 mm, 63.5 mm, −5 mm) |
The WPS2, when combined with its calibration constants, measures wire position in mount coordinates. The WPS defines mount coordinates in exactly the same way as the BCAM, as we describe in the BCAM User Manual. Wires run parallel to the z-axis. The optical center of the WPS2 is the place where the two camera center lines intersect, as shown in this sketch. The nominal position of this intersection is (38.0 mm, 63.5 mm, −5 mm). The overlapping field of view of the two cameras is not symmetric about the optical center. The guaranteed square dynamic range of the WPS2 for a thin wire is ±6 mm in x, ±4 mm in y about the point (41.0 mm, 63.5 mm, −5 mm), which we call the dynamic range center. We calibrate the WPS2-B in an area 12 mm wide in x and 8 mm high in y. Because the WPS2 can be mounted in any orientation, we can orient the rectangle of its dynamic range with the long side horizontal or vertical. When the long side is vertical, the instrument can accommodate up to 12 mm variation in wire sag.
Assuming we know where its mounting balls are with sufficient precision, we can place a wire anywhere in the WPS2 dynamic range, and the WPS2 will tell us the location of the wire with an absolute accuracy of better than 5 μm rms. As the wire moves, the WPS2 will measure wire movement with a precision of better than 1 μm rms. The time to acquire one measurement is roughly 500 ms when used with the LWDAQ Driver (A2071E). The following table gives the properties of the WPS2 electronics.
| Parameter | Value |
|---|---|
| Operating Temperature | 0-75°C |
| Thermometer Accuracy | ±0.3°C |
| Thermometer Precision | ±0.05°C |
| Thermometer Stability | ±0.05°C |
| Image Noise | <0.2 ADC counts rms |
| Image Dark Current | <25 ADC counts/s at 20°C |
| Image Dynamic Range | >150 ADC counts |
| Image Intensity Precision | 0.5%, 8-bit counts |
| Minimum Exposure time | <10 ms |
The operating temperature range is determined by the radiation-resistant diode-chain voltage regulator in the A3022 circuit, as we describe in Diode Regulator.
| Parameter | Value |
|---|---|
| Operating Temperature | 0-75°C |
| Resistance After First Unspooling | <1 MΩ/m |
| Resistance After Tenth Unspooling | <10 MΩ/m |
| Resistance After Kinking or Folding | Not Specified |
| Density | 210 mg/m |
| Density Uniformity | ±1% over 100 m length |
| Breaking Strength | 360 N |
| Diameter | 480 μm when loaded to 300 N |
| Recommended Operating Tension | 300 N |
| Maximum Sag at Recommended Tension | 4 mm for 100-m span |
The table above gives the properties of our Conducting Polymer Line, part number CPL1. You can compare this wire to wire made of other materials here. For prices of WPS2 and CPL1 see our price list.
The WPS mounts on three steel balls. In order for our calibration constants to be accurate, these balls must be 6.35 mm in diameter, which is one quarter of an inch. In order to make sure the balls acquire no surface corrosion over the years, they must be made of 316 stainless steel. The WPS mounting plate is identical to the ones we use with BCAMs.

The mounting plate provides three conical depressions into which we glue three quarter-inch stainless steel balls. We like to use DP460 structural epoxy to hold the balls in place, because it is strong and stable. But any epoxy suitable for bonding metal will work well. When we have no sensor fastened to the mount, we cover the balls with a plastic cap, fastened in place with two M4 screws. The following video shows how we mount a WPS on such a mount, with the help of a torque screwdriver.
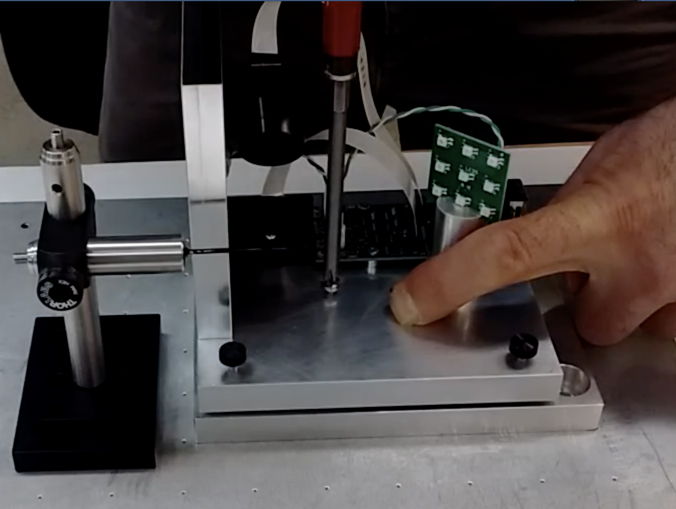
If you do not have a suitable torque screwdriver, let us know, and we will include one with your order of WPS2 sensors.
The WPS2 is a LWDAQ Device. Plug it into a LWDAQ Driver or LWDAQ Multiplexer, open the LWDAQ Software and select the WPS Instrument from the Instrument Menu. Set the instrument's internet protocol address, driver socket, and multiplexer socket to select the target WPS. Press Acquire. The WPS Instrument, shown below, captures images from both WPS cameras at once and displays them one above the other, with the image from camera one on top. With daq_simultaneous set to 1, the images are illuminated by the same flash of the LED array. With the same parameter set to 0, two separate flashes are used. This latter setting is useful for debugging the simultaneous data acquisition, and is also required by the WPS1 electronics, which do not support simultaneous exposures.
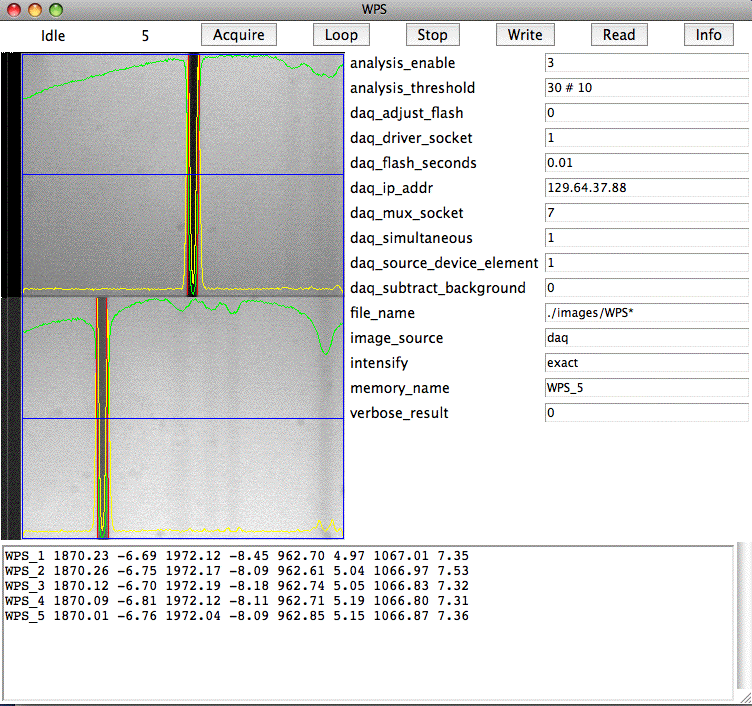
The WPS instrument analyzes both images in the same way, whether they were acquired simultaneously or separately. The results of analysis are displayed on the screen. For details of the types of analysis available, and how the results will be displayed, see WPS Instrument. The Wire Monitor Tool allows us to define lists of WPS devices, specifying each device with its serial number. You will find the Wire Monitor tool in the Tools menu of LWDAQ 8.7.11 or later.
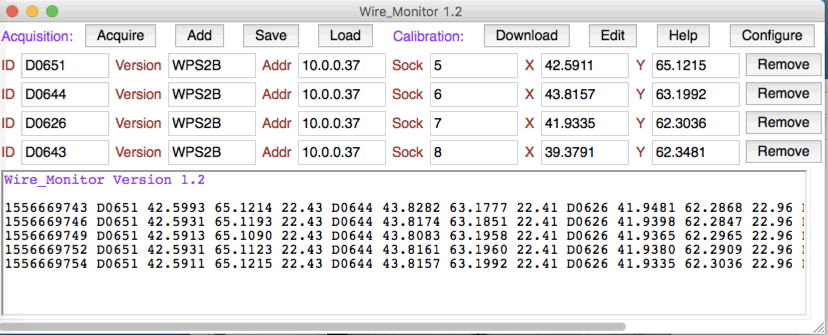
The Wire Monitor Tool allows us to create a list of WPS and obtain from them, with the help of their calibration constants, the position of the wire in each of their mount coordinate systems. We specify the serial number of each WPS, and the tool will look up the device's calibration constants in its own database. We can update the database with the Update Calibrations button. The update attempts to download the latest on-line WPS calibration database file and over-write the existing database in the Wire_Monitor script. We specify data acquisition IP address and driver socket to select the WPS for data acquisition. We specify the WPS type, so the Wire Monitor can configure the WPS Instrument correctly. Early versions of the WPS do not support simultaneous image capture from both image sensors and require longer exposure times. The version should be a string like WPS1A, WPS1B, WPS2A, WPS2B, or WPS2C. When we press Acquire, the Wire Monitor obtains images from all listed sensors, analyzes them, looks up calibration constants, and calculates wire positions for each of them. The wire position is displayed with digits within the panel of each WPS device, and combined with all the other wire positions in a results line. The wire position is in mount coordinates. The result line begins with a UNIX timestamp and then for each sensor it lists x, y, and T. The x and y are the position in millimeters of the wire in mount coordinates where it intersects the reference z-plane. The z-plane is the plane in mount coordinates with z equal to the ref_z parameter, which by default is set to −5 mm. The temperature is in Centigrade, and is measured by a thermometer on the camera wall. The result line does not contain the sensor name, but lists the coordinates in the order in which the sensors appear in the sensor list. Press the Add button to add a WPS to the list, and Remove to remove one. Press Save to save the list you define, and press Load to load a list from disk.
The Wire Monitor contains its own database of calibration constants, calculates wire positions in WPS mount coordinates directly, and reports them in entry boxes and in a result string. The result string also contains the temperature of the WPS end wall, in Centigrade. You can download the latest WPS calibration constants from the OSI website with the Wire Monitor's Download button. You can edit the calibration constants yourself with the Edit button.
For larger WPS systems, or when we want to combine data acquisition from other types of sensors, we use the Acquisifier to obtain measurements from multiple wire position sensors. The WPS_6.tcl is an example Acquisifier script that obtains wire edge positions from multiple WPS1 or WPS2 instruments and combines these with calibration constants to obtain measurements of wire position in the coordinates of the instrument mounting balls.
The WPS2 comes with one 1-kΩ RTD sensor glued to the end wall to measure the temperature of the WPS frame. To read out the RTD, use the Wire Monitor Tool, or use the Thermometer Instrument with daq_device_name = A3022 and daq_device_element = 1. There are two plugs on the WPS Head (A3022) for RTDs. The WPS end-wall RTD is connected to P1. We can connect another RTD to P2 and read it out as device element 2. The RTD_1.tcl is an example Acquisifier script that obtains temperature measurements from WPS2s.
The following plot shows data we obtained from one instance of the LWDAQ Software, using two separate Acquisifier scripts. We open the Acquisifier from the Tool menu, then press Spawn to create a second Acquisifier. We use one with a script like WPS_6.tcl to obtain wire position, and another with a script like RTD_1.tcl to obtain temperature measurements. We set the wire position script to execute every five seconds, by setting its cycle period seconds parameter to 5. We set the temperature script to execute every sixty seconds by setting its cycle period seconds to 60.
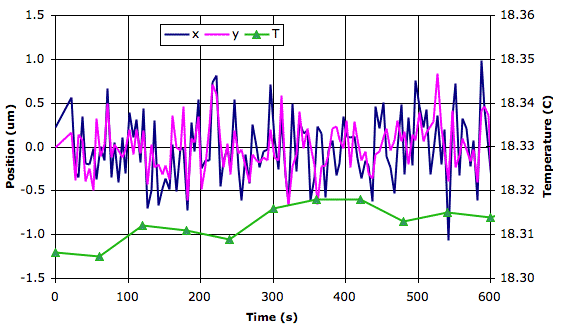
The graph above shows us the short-term resolution of the WPS2 with a black 0.3-mm Vectran® wire and flash time 10 ms. We can operate equally well, perhaps with slightly improved resolution, with 20 ms or 30 ms flash times. Once we get to 40 ms, however, there is a chance of saturating the CCD. The resolution in x is 0.4 μm and in y is 0.4 μm. We expect the y-resolution to be better because the triangulation angle of the cameras favors the vertical direction over the horizontal.
When combined with a LWDAQ Driver (A2071E), exposure time 20 ms, and simultaneous image captures, the WPS Instrument acquires image pairs from the WPS2 at 2.3 Hz. With separate flashes, the rate drops to 2.0 Hz. With the older A2037E driver, the rate with simultaneous exposure is 0.7 Hz.
The Wire Position Sensor Express script (WPSX) allows us to connect to six WPS2s simultaneously and acquire images from them in parallel. Open LWDAQ and run the script with Run Tool from the Tool menu. We see a window with separate sections for six sensors. Each sensor can be a WPS2 or WPS1 depending upon the WPS2 checkbox. You can enable individual sensors with another checkbox. Each sensor gets its own IP address, flash time, driver socket, and name. We can connect several sensors to the same driver if we like, but the fastest acquisition will occur when each sensor has its own driver. When it acquires the images, it displays a miniature version of each image in the window. There are no analysis results overlaid upon these miniature images, but if you click on one of them, another window opens up giving you a larger version of the image, and this one will have the results of analysis overlaid.
The WPSX tool uses the name to look up the sensor's calibration constants in a calibration table that is embedded in the script itself. The WPSX analysis looks up each sensor in the list and converts the wire image positions into actual wire measurements in mount coordinates. It displays these on the screen in the same format as the WPS_5.tcl Acquisifier script. There is a timestamp at the start of the result line, followed by sensor name, x, and y in millimeters for each sensor. If the WPSX cannot find the sensor in its calibration table, it will print the measurement in blue, having used the calibration constants for the first camera in its calibration list. If the WPS analysis returns an error, the measurement will be red, with x and y set to −1. With Save checked, the WPSX saves the result line to a result file. You pick the file with buttons in the Configuration panel. The Draw and Analysis buttons enable the drawing of images in the WPSX window, which takes a little time, and the analysis of the images also.
With a fast local ethernet connecting the data acquisition computer to the six drivers, and a fast computer to display and analyze the images, data acquisition should proceed at the same rate we would obtain from a single sensor. We turned off image display and drawing on our old lap-top computer, and acquired images from six sensors on our departmental network from six A2037E drivers. The time taken to acquire the six images varied from 1.5 s to 4 s, so that our average rate was around 0.4 Hz. The variability in the rate suggests traffic on our local internet is slowing down the image transfers. In theory, with six A2071E drivers and an isolated 100-MBit/s Ethernet, we can obtain a sustained acquisition rate from six sensors of 2.0 Hz.
We can control the WPSX through the LWDAQ System Server. Open the System Server from the File menu and set it to execute. Open the WPSX also and configure it to acquire data as you like. From another computer, open a socket to the System Server and send the command "WPSX_execute Acquire". Now read back the line that this command returns, which will arrive once the acquisition and analysis is complete.
[24-APR-19] You will find the calibration constants of all WPS1 and WPS2 sensors in WPS_Calibrations.txt. We calibrate WPS2 sensors with the same procedure we developed for the WPS1. At each pin position in the calibration, we use the Acquisifier with script WPS_Acquire.tcl to measure wire edge positions and rotations, WPS2 temperature, and CMM temperature. The Acquisifier writes all these values to a text file, and also stores the combined top and bottom camera image as obtained from the WPS Instrument. We use Calibrate.tcl to combine the CMM and WPS calibration measurements into a single data file. This same program proceeds to determine the calibration constants of each camera as well as the error made by each camera when measuring the calibration pin positions. The root mean square length of these errors for each camera is the camera calibration error. The program proceeds to determine the error of the two cameras acting together, which we call the sensor calibration error. The text output of the program contains the individual sensor calibration errors that we use to make maps of sensor calibration error like the one shown below.

You will find the sensor calibration error maps for most, but not all, WPS2 sensors in our data folder. If we need to re-calculate the wire edge positions in the image we use Reanalyze.tcl. To pass quality control, the sensor calibration error must be less than 5 μm rms when measured across the entire field of view. The average sensor calibration error is around 3.5 μm rms. Our WPS Calibrations page is a text file that lists the calibration constants of all calibrated WPS1 and WPS2 sensors. Each line in the file provides the calibration constants for one of the cameras on a sensor. The table below defines the entries in each line for some example sensors.
------------------------------------------------------------------------------------------------
                pivot (mm)              sensor (mm)            rot (mrad)          pivot-  error
Camera     x      y        z       x      y        z         x        y       z    ccd (mm) (um)
------------------------------------------------------------------------------------------------
C0562_1 -3.5814 88.8400 -4.9796 -12.6389 94.3849 -4.9598 -1558.772  -0.344 -566.827 10.620  1.6
C0562_2 -3.2934 39.0816 -4.9960 -12.3827 33.6002 -5.1009  1582.496  -3.005  536.976 10.615  1.0
C0563_1 -3.5214 88.9127 -5.1230 -12.7312 94.5887 -5.0763 -1575.969   5.514 -542.610 10.819  1.5
C0563_2 -3.3509 39.2680 -4.9734 -12.5065 33.7752 -4.9481  1551.272  19.575  539.416 10.677  1.1
C0564_1 -3.9747 88.5415 -4.7928 -13.1483 94.0905 -4.6594 -1569.021  -8.746 -512.315 10.722  1.4
C0564_2 -3.9695 39.3654 -4.7458 -13.1743 34.0412 -4.7220  1593.724   4.024  520.136 10.634  0.9
C0565_1 -3.5672 88.6207 -5.0629 -12.6076 94.2726 -4.9598 -1567.705  10.392 -546.849 10.662  1.0
C0565_2 -3.4484 39.8043 -5.2642 -12.5624 34.5183 -5.4396  1565.119  -3.078  508.839 10.537  1.3
------------------------------------------------------------------------------------------------
Table: Calibration Constants for Existing WPS2s. The errors are the camera calibration error in microns.
Each line contains the name of the sensor with an underscore and the camera number. The nine calibration constants follow, and then two further auxiliary values. The distance from the pivot point to the image sensor is "pivot-ccd", which is not immediately obvious from looking at the pivot and sensor positions, but is simply the distance between them. The camera calibration error follow. We obtain a good estimate of the sensor calibration error by adding the two camera calibration errors in quadrature.
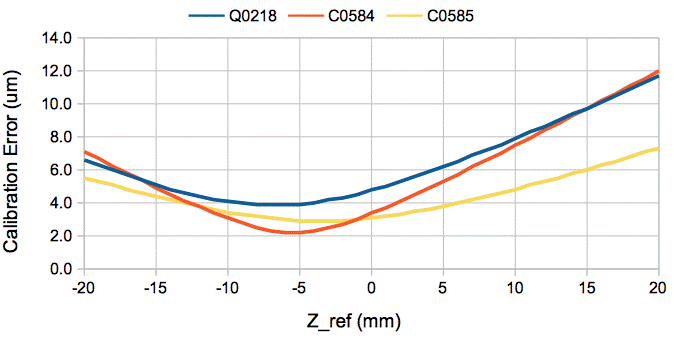
[02-DEC-15] By default, we calculate wire position where the measured wire center line crosses the plane z = −5 mm. The graph below shows how the sensor calibration error varies with our choice of z-plane. We provide plots for our new Q0218, a WPS2-B, and two WPS2-As. We note that the calibration range for the WPS2-As is smaller.
[13-APR-19] Using our calibration constants for the 36 WPS2 made in 2013-2015, we use this script to determine the intersection of the two camera center-planes at z = −5 mm. The average intersection point is (37.4, 63.5, −5) mm, with standard deviation 0.5 mm in x and y. The maximum deviation from this average is 1.5 mm.
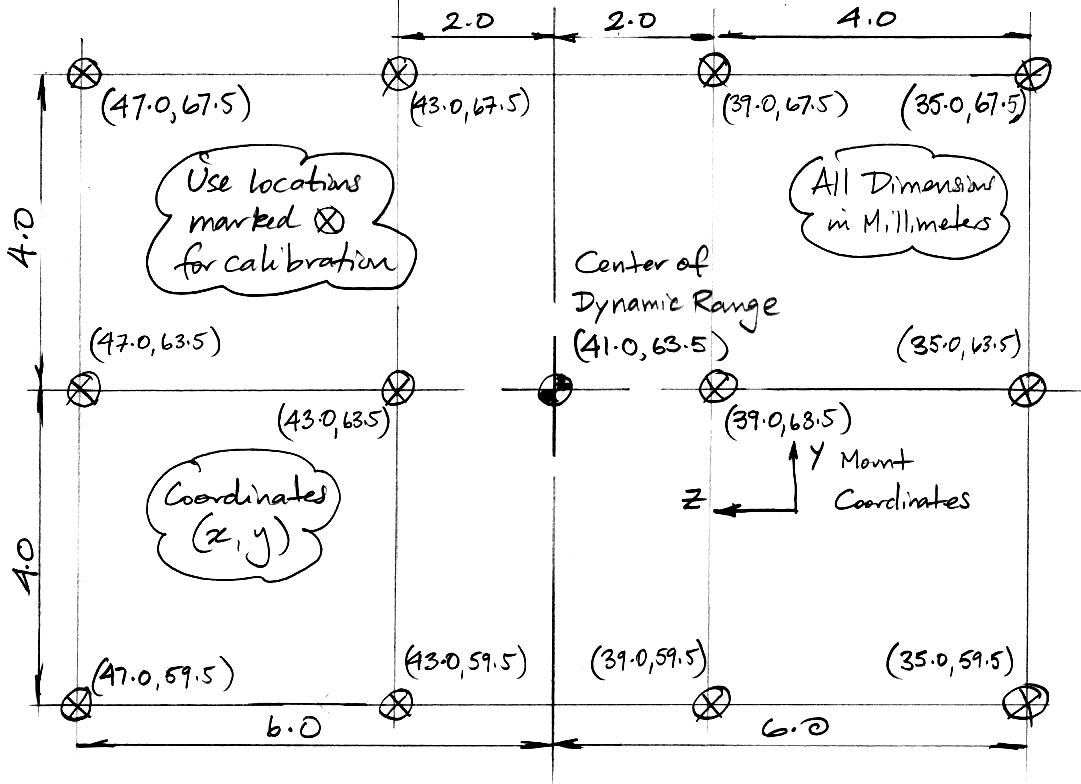
[12-APR-19] The WPS2 provides a calibrated dynamic range of ±6 mm in x and ±4 mm in y centered about on (41.0 mm, 63.5 mm, −5mm) in mount coordinates. The position of any wire within this range will be measured with absolute accuracy 5 μm rms. The field of view of the sensor extends beyond the calibrated dynamic range, but the accuracy of the position measurement will degrade as we mover farther outside the calibrated range. We align the WPS2 cameras with four 1.6-mm diameter pins at locations (35.0, 67.5), (35.0 59.5), (47.0, 59.5), and (47.0, 67.5), as shown below.
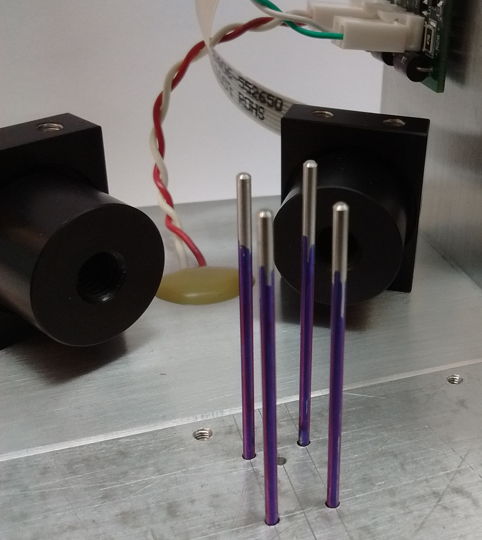
We calibrate the sensor with a 1.6-mm diameter pin, which we move throughout the dynamic range of the sensor, including the corners, as shown in the drawing below.
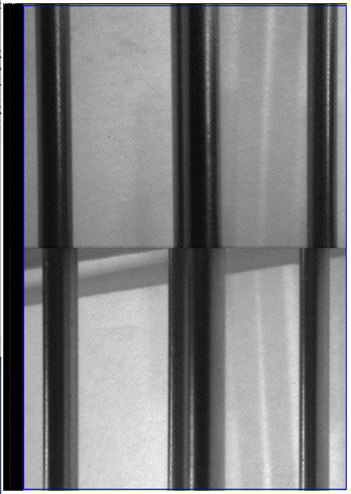
We align the cameras until they see all four pins on the alignment jig. The figure below shows a typical WPS image of the four alignment pins. When all four pins are in view of both cameras, we are certain that all our calibration pin positions will be visible, and our dynamic range will include the specified dynamic range.
[05-JUN-13] Our original calibration routine explored 38±6 mm in x and 63± 3 mm in y. We re-calibrate sensors C0584 and C0585 with a grid of 37 points covering 41±6 mm in x and 63±4 mm in y. The following two plots show the location of the calibration pin in mount coordinates, as measured by the CMM, and the exaggerated error of the calibrated WPS in measuring these same pin positions.

The sensor calibration error of C0584_C is 4.4 μm, and that of C0585_B is 3.2 μm.

We are unable to calibrate the sensor over a ±5 mm range in y. Each sensor does have a ±5 mm dynamic range in y, but the center of this range varies by ±1 mm from one sensor to the next. Furthermore, the pin we use in calibration has diameter 1.6 mm, which is far larger than the 0.4-mm wires we expect to use with the WPS2. The thickness of the pin subtracts another 0.6 mm from our calibration range. The result is we calibrate over 12 mm × 8 mm instead of 10 mm × 10 mm.
[01-DEC-15] We calibrate Q0218 over a region 18 mm in x and 8 mm in y. The plot below shows the calibration points and the exaggerated errors.

The steel pin we use for calibration is 1.6 mm in diameter. The calibration points are such that the edge of the pin is at least one diameter away from the edge of the dynamic range. We have set the center of the field of view to within ±0.5 mm. With a 0.3-mm Vectran® wire, we expect the guaranteed dynamic range to be a little more than 10 mm high and 20 mm wide.
[11-APR-19] The WPS2 optics consist of a lens, aperture, sensor, lens holder, and the baffle. We model the optics as virtual thin-lens systems, tracing rays through single-point apertures that we call the camera pivot points. The actual lens is not thin: it is 2.75 mm thick and only 6.0 mm in diameter. The aperture is not coincident with the lens center: it is a hole in a metal sheet placed behind the lens. For proof that the WPS optics are equivalent to a thin-lens system for small ray angles, see Page One and Page Two of a derivation. In the equivalent thin-lens system, straight rays pass through the pivot point. The purpose of calibration is to determine the location of the pivot point, the location of the sensor center, and the orientation of the sensor. We discuss aberration and distortion in the WPS1 and WPS2 optics in detail in the WPS1 Performance manual, see Aberration and Distortion sections.
The orientation of the lens, the distance between the aperture and the lens, and the orientation of the image sensor have a strong effect the aberration and distortion. The orientation of the image sensor we obtain through calibration so as to eliminate its effect upon our measurement accuracy. We always put the aperture behind the lens, because otherwise we run the risk of debris becoming caught between the aperture and the lens. We mount the lens with the flat side facing out, and the aperture as close as we can get it top the convex surface. With this arrangement, two sources of aberration tend to cancel, so as to reduce the non-linearity to 2 μm rms across the field of view.
The WPS2-B mounts the lens with the convex side in, so the lens sits on its convex side, resting upon an angled flange. If we place the lens as shown in this drawing, the error due to aberration should be less than 2 μm rms across the field of view. But the centering of the lens is difficult when we glue the convex side to the lens holder. If the lens is rotated so that its optical center is offset by 0.5 mm from the axis of the holder, a 5-μm rms error arises due to the introduction of a wedge angle. Furthermore, the cancellation of the first two sources of aberration is a strong function of the lens-aperture separation, which we suspect can vary from 0.4-0.8 mm in the WPS2-B depending upon the thickness of our glue layer and the exact seating of the convex surface. If such errors arise due to imperfect construction, we cannot correct for them afterwards, unless we add a cubic term to the calibration of the cameras, and hope to discover the size of the aberration. Measuring a cubic aberration, however, requires more calibration points, which we are hesitant to introduce. Therefore, we tolerate whatever aberration errors exist in the WPS2-B and make no effort to correct them.
If we mount the lens with the convex side out, so the lens sits on its flat side. The original two sources of aberration no longer cancel, resulting in a cubic non-linearity of 4 μm rms. This non-linearity is, however, predictable, because it is only weakly dependent upon the lens-aperture separation, and the orientation of the lens is more reliable when we mount it upon its flat side. When we experimented with such cameras, we found that they did indeed have a consistent cubic aberration that we could correct to leave the calibration error below 1 μm. But the CCD to pivot point distance increases from 10 mm to 13 mm when we reverse the lens, which reduces our dynamic range by 30%, which we cannot accept. So we continue to mount the lens with the convex side close to the aperture.
[29-APR-19] We measure the absolute accuracy of a sensor calibration by looking at its root mean square error in measuring its calibration pin positions. Because there are twenty pin positions, and each one provides two constraints, one in x and one in y, we have forty contraints in all, and each camera has only nine calibration points. Our CMM measures each pin position with respect to three reference balls on the stage that holds the WPS sensor, and previously measures the WPS mounting balls with respect tp these reference balls. The total error in the CMM's measurement of the pin position in WPS coordinates is less than 3 μm rms. If the root mean square disagreement between the WPS and the CMM is less than 5.5 μm across its entire specified dynamic range, we claim the absolute accuracy of the WPS is better than 5 μm rms.
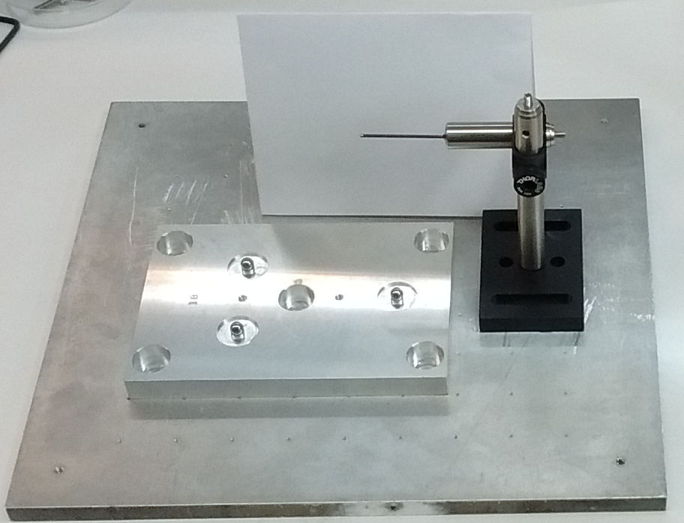
We measure the resolution of our sensor calibration by placing sensors one after the other on the same mount with the same in to look at. We have a resolution test stand for this purpose, shown above. When we take repeated measurements from the same sensor without un-mounting and re-mounting, we obtain the sensor resolution of 0.5 μm rms. When we un-mount and re-mount the same sensor ten times, we obtain mounting resolution of 2.0 μm. When we replace one sensor with another ten times, we obtain the calibration resolution of 4 μm.
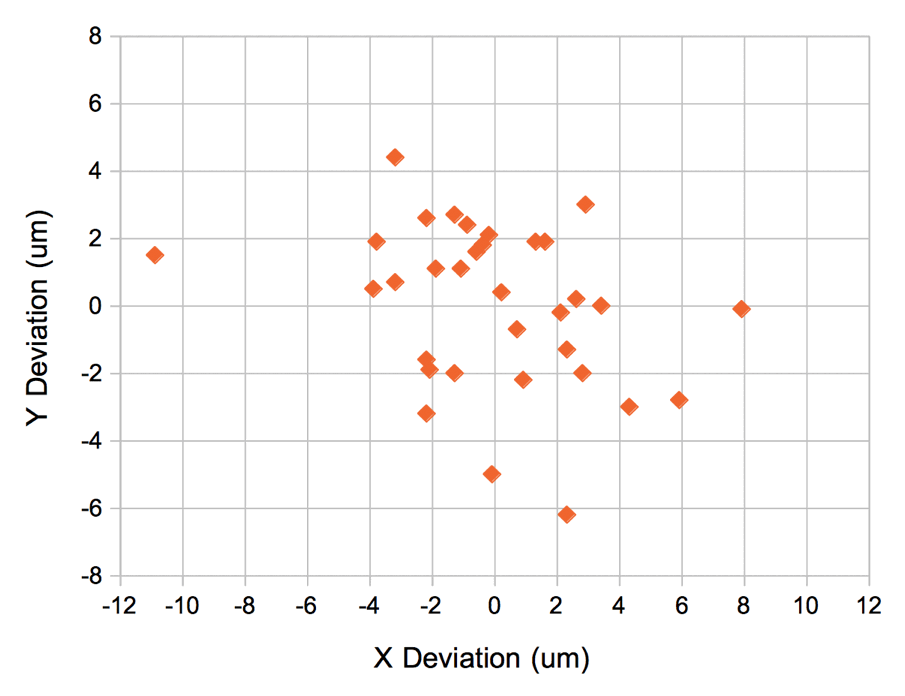
The WPS2's on-board thermometer has specified absolute accuracy ±0.3°C from the manufacturer. We use 0.01% test resistors to check the absolute accuracy of the WPS Head (A3022) temperature measurement circuit, and obtain absolute accuracy ±0.05°C. The 1000-Ω RTD mounted on the WPS2 end-wall is certified to ±0.3°C by its manufacturer. When we replace sensor on our Resolution Test Stand, we measure temperature each time. In one test of eleven sensors, the standard deviation of the sensor temperatures was 0.26°C. We conclude that the replacement resolution of the sensor temperature measurement is better than 0.3°C.
[01-MAY-19] What we refer to as the "wire" in "Wire Position Sensor" is a stretched, conducting line that provides the reference shape by which objects may be arranged along a straight line. The line must be a dark color so it shows up well against the white backdrop of the WPS images. The wire must be conducting so that electrostatic charge does not build up upon its surface and cause it to be displaced towards other conducting objects. A resistance of 1 GΩ/m is sufficient to dissipate electrostatic charge accumulating upon the wire. The wire must have a high ratio of breaking strain to density so that we can minimize the sag in the wire span. We accommodate the wire sag by fitting a catenary to wire shape, but the smaller the sag, the less accuracy we will demand of our catenary fit, and the less we rely upon the uniformity of the wire's physical properties. Metal was the original material used for the stretched line, but metal wire cannot compete with the strength to density ratios of modern carbon and polymer fibers.
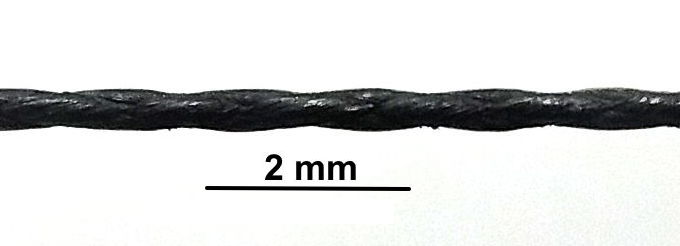
We make our wire out of braided fishing line made with Dyneema® fiber. We impregnate this fiber with water-based, conducting, black, carbon paint to give it a resistance less than 1 MΩ/m at the time of manufacture. The impregnation process relies upon an abundance of microscopic openings in the surface of the braided line by which the carbon paint penetrates into the interior of the braid, where it remains trapped in place once the paint has dried. Not all braided line provides sufficient openings, so we must choose the line with care. For example, we bought four sizes of line in the series from the same manufacturer: 14-kg (30-lb), 18-kg (40-lb), 36-kg (80-lb), and 68-kg (150-lb) eight-strand, white, braided line. We chose white line so we could better see where the carbon impregnation was present. We are able to coat the 14-kg and 18-kg lines, but these thinner lines are almost circular in cross section, and the paint forms a coating around the line, rather than penetrating to the interior of the braid. Winding and unwinding the line from a spool a couple of times causes the coating to break off in places, showing bright white line underneath. The 36-kg and 68-kg lines, however, have a textured surface when slack, and a circular cross-section when they are stretched to near breaking strain. The textured surface of the slack line draws the paint inside. There is no casing of paint around the outside of the wire. The textured surface remains as before impregnation, only it now appears black and shiny. We can coil and uncoil the line from a spool ten times and see no significant effect upon its resistance.
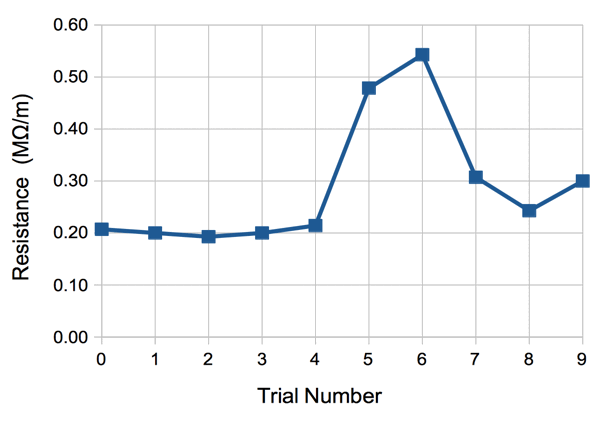
The impregnation of the larger line is still fragile compared to the braided line itself, which is exceedingly tough. If we catch the line on an edge while pulling it, or step on it with a boot and twist our foot, the line will go gray where it has been abraded, and its resistance will jump to many gigaohms in a single gray centimeter. So long as we avoid kinking or stepping on the line, its resistance should stay well below 1 GΩ/m. The 36-kg white line comes in 1000-m spools, is 0.48 mm in diameter when stretched near its breaking strain, and holds our impregnation through many coiling and uncoiling exercises. It is the line we have chosen for our conducting, high-strength, WPS reference wire.
Suppose we install a 200-m span of conducting polymer line (CPL1), apply its recommended operating tension (300 N in the case of CPL1), and measure its resistance. We expect the resistance to be of order 200 MΩ. But if we have scratched, bent, or mutilated the wire during installation, we will find the resistance of the line is now greater than 40 GΩ. We must find the section of line with high resistance, and repair the line by re-impregnating with carbon paint. The video below shows how this can be done.
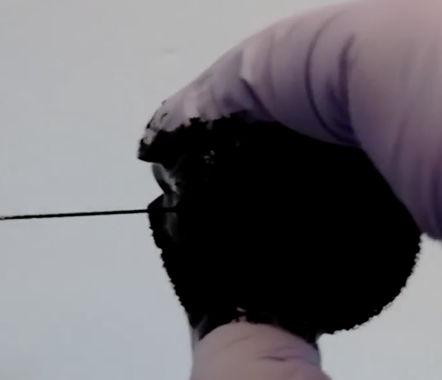
We are happy to ship to our customers a Conducting Polymer Line Repair Kit, consisting of a bottle of carbon black paint, some sponges, gloves, and a container to keep them in. You can make your own hanging resistance probes with a paper clip and some copper tape. We can check the conductivity of 10-m sections of line using a standard multimeter set to 40-MΩ resistance measurement. To measure the resistance of an entire 200-m span, we can use a 10-V power supply in series with the 200-m line and a standard multimeter set to 2-V voltage measurement. The input resistance of a standard multimeter is 10 MΩ. This 10 MΩ makes a voltage divider with the resistance of the 200-m span. We apply +10 V to one end of the line, connect the +ve terminal of the multimeter to the other end, and 0 V to the −ve terminal of the multimeter. When the resistance of the line is 200 MΩ, we will see 500 mV on the multimeter.
The mechanical structure of the WPS2 is made entirely of aluminum. The same is true of all versions of the WPS1. The image sensor itself, however, is made of silicon. When the aluminum chassis warms up, its shape can change if there is a temperature gradient from one side to the other. We measured wire position with fluctuations in temperature in WPS1 Performance. With daily 1.5°C changes in temperature over a period of a week, the measured position was stable to better than 0.5 μm rms. In the face of sudden 1°C changes in ambient temperature, we the measured position jumped by 2 μm and settled back to its previous value. Here we concern ourselves with the change in measured position that results from a slower change in temperature, so that we can assume the entire sensor is in thermal equilibrium.
Let us suppose we calibrate our sensor perfectly at some known temperature Tc. The coefficient of thermal expansion of aluminum is kAl = 25 ppm/K. For the moment, let us assume that all parts of the device, including the image sensors, share the same coefficient of expansion. Thus we assume that at temperature T, every dimension of the sensor is larger by (T−Tc) kAl. Now let p(T) be the point that the sensor measures to be at mount coordinates (x, y) when the sensor is at temperature T. Because of thermal expansion, the actual position of p varies with temperature. But at Tc, we have p(Tc) = (x, y). The sensor is held in place by its cone ball, and the center of this ball is the origin of our mount coordinates. As the sensor expands, the coordinates of the origin do not change. Because the sensor expands uniformly, it does not rotate upon its kinematic mount.
p(T) = (T−Tc)(x, y)kAl.
Consider the point p(Tc) = (38 mm, 64 mm), which lies near the center of the WPS1 and WPS2 field of view. With our assumption of uniform expansion, we have:
dp(T)/dT = (x, y)kAl = (38 mm, 64 mm) × 0.000025/K = (+0.95, +1.6) μm/K.
By definition, we will measure the position of p(T) to be (x, y) at any temperature, so uniform thermal expansion kAl introduces a measurement error of −0.95 μm/K in x and −1.6 μ/K in y. If we warm up our sensor by 10°C above its calibration temperature, the center of its field of view moves up by 9.5 μm and sideways by 16 μm.
Now suppose we now move our point p(T) a distance w across the field of view at temperature T. The sensor will report a movement:
w(T) = |Δp(T)| = w(1−(T−Tc))kAl.
If we warm up our sensor by 10°C above Tc, it will measure a 10-mm movement to be only 9.9975 mm, for a net error of −2.5 μm, which is small enough to ignore. We see that change in temperature of one or two degrees will introduce measurement errors less than 5 μm rms, but larger changes we must account for. We have always measured the temperature of the sensors during calibration, and now the WPS2 provides its own on-board thermometer to determine the relative change in temperature with respect to calibration. By adding 0.95 μm/K to x and 1.6 μm/K to y we can correct the WPS measurement at the center of its field of view.
Let us now consider the silicon image sensor. In the direction perpendicular to the wire image, the sensor package is held in a 10-mm aluminum aperture. The package is plastic in the WPS1 and ceramic in the WPS2. Both have coefficients of thermal expansion that are much smaller than that of aluminum. The gap between the aperture and the sensor is filled with a thin layer of glue. When the aperture warms by 10°C, it will tend to expand by 2.5 μm, while the image sensor package will not. Stress will develop between them. The stress resists the widening of the aperture encourages some stretching of the sensor package. To the first approximation, the center of the silicon image sensor will not move with respect to the center of the aperture. Thus we expect the non-expansion of silicon to have no effect upon the position of the center of the field of view of the WPS. When a wire is at the center of the field of view, its images lie upon the center of both image sensors.
Now consider a wire at the edge of the field of view. The coefficient of thermal expansion of silicon is only 2.6 ppm/K. We previously assumed that the sensor expanded by 25 ppm/K. If the width of 100 pixels was 1 mm at 20°C, we assumed they would expand to 1.00025 mm at 30°C. But now we see that the width of 100 pixels will expand only to 1.00003 mm at 30°C. Because we assumed the pixels had expanded by 25 ppm/K, we figured the WPS would under-report displacements by 25 ppm/K. Now we see that the WPS will under-report displacements by only 2.6 ppm/K. In our equation for w(T), we should use kSi = 2.6 ppm/K instead of 25 ppm/K. A WPS that is 10°C above its calibration temperature observing a 10-mm movement of a wire will report this movement to be only 0.26 μm less than 10 mm, which is an effect so small we can ignore it.
We conclude that the expansion of the aluminum chassis causes a displacement of the entire field of view of the WPS1 and WPS2 by +0.95 μm/K in x and +1.6 μm/K in y, but no significant change in the scale of its measurements within the field of view, nor any significant rotation of the field of view. To correct WPS measurements for temperature, we add (T-Tc)(0.95, 1.6) μm/K to the sensor measurement, where (T-Tc) is the amount by which the current temperature is above the calibration temperature.
[25-JAN-12] Here is a picture of the CERN test stand taken today. There are two lines of WPS2s looking at a silver-coated white Vectran® wire. There are two lines of capacitive wire sensors also, looking at carbon fiber wire. The Vectran® wire is under tension of a 15 kg weight.
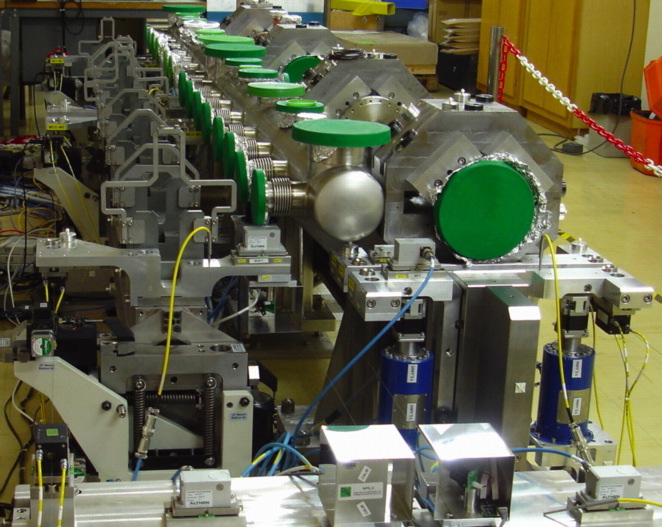
Half of the WPS2s are mounted upside down like this one.
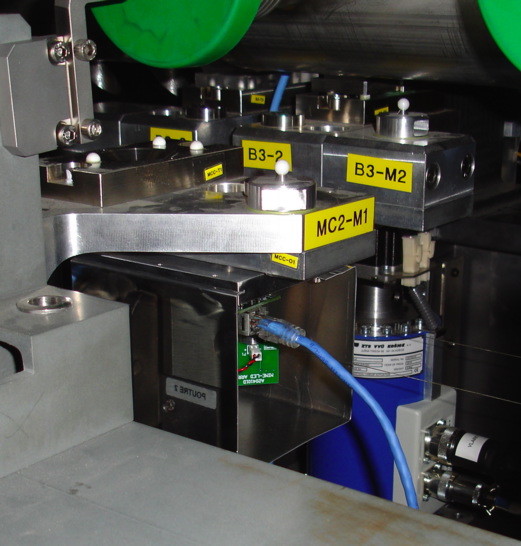
[30-APR-12] We receive back from CERN four WPS2s. Numbers C0562 and C0563 they sent back because we were suspicious of our original calibration. Numbers C06565 and C0568 they sent back because they were damaged in shipping. The RJ-45 connectors on the main circuit board had been forced up, breaking the shielding tabs. We repaired the damaged sensors and re-calibrated all four. We apply the new calibration constants to the old calibration measurements. The following figure attempts to show how the sensor has changed.
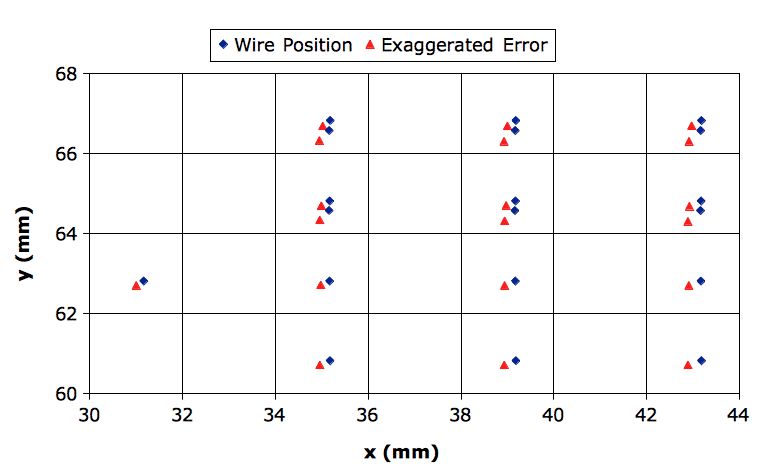
The C0568_B calibration constants applied to the C0568_A images give us a sensor calibration error of 29 μm. The figure shows that the errors are correlated. The error is greater for positions at which the pin is rotated. When we perform the same comparison for C0565 we obtain a sensor calibration error of 11 μm, also strongly correlated from one point to the next. These errors are consistent with changes in the positions of the optical components due to physical damage.
The C0562 and C0563 sensors disagree with their past calibration constants by roughly 6.9 μm and 5.3 μm respectively. The following figure shows how C0563 has changed.
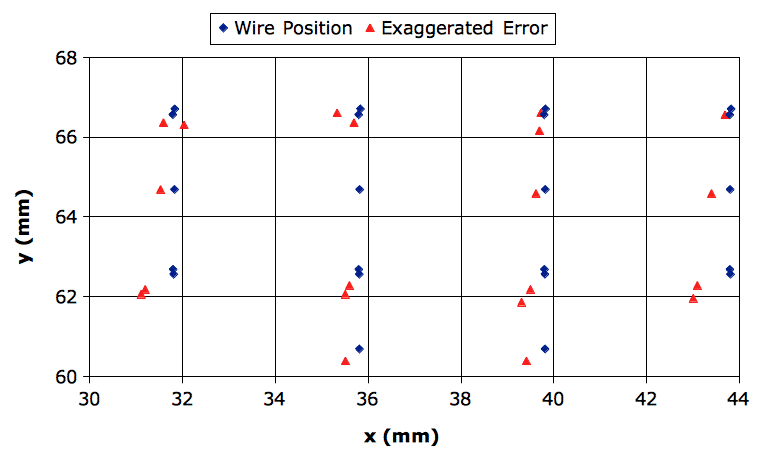
We see that the error in the center of the field of view is negligible, and increases towards a maximum of around 10 μm at the edges of the field of view. The original calibration we performed at 18.5°C. The new calibration we performed at 16.7°C. The same plot of exaggerated errors for C0562 shows a similar error pattern. The original C0562 calibration took place at 18.3°C and the new one at 16.5°C. We note that our CMM is self-compensating for the expansion of steel, which is 13 ppm/°C, while our WPS2 is made out of aluminum with expansion coefficient 25 ppm/°C.
[12-SEP-12] At CERN, the survey group has a motorized x-y stage with a WPS mount. They place a WPS on the stage, keep the wire stationary, and move the WPS so that the wire moves around in its field of view. We receive images for both Vectran® and metal wire measurements. We analyze the images and find that there are some with only one wire. We eliminate these. There are some with the wire touching the edge. We eliminate these. We find that our analysis with pre-smoothing introduces a shift in image position with these sharp images, especially when the wire is near the image edges. We resturn to our original derivative analysis with no pre-smoothing and no joining of parallel clusters.
The x and y stages are not perpendicular, nor are they parallel to the WPS mount coordinates. At CERN they measure the rotation of the stage with respect to the WPS mount and obtain −0.8 mrad in x and −1.7 mrad in y. We rotate the stage coordinates and add an offset to move the stage origin to the WPS mount coordinate origin. We subtract the stage measurements from the WPS measurement and so obtain a plot of the disagreement between the WPS and the Stage.
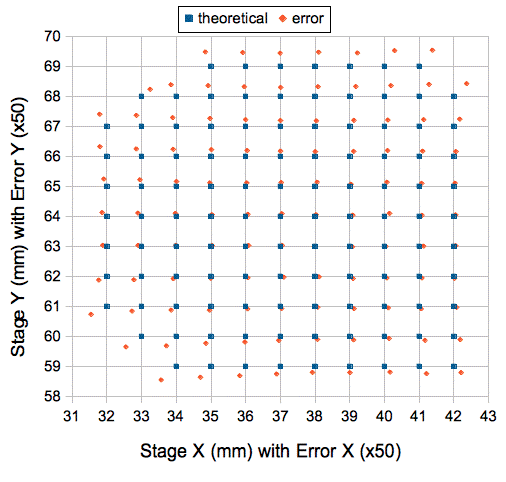
We see that the disagreement between C0564 and the X-Y stage is 4 μm rms. If we add a scaling factor to the account for thermal expansion of the stage or WPS, we find that we can reduce the disagreement to 2.8 μm rms. But the scaling factor required to achieve this reduction is 1.0005, or +500 ppm, which is far too large to be explained by thermal expansion of aluminum. A 500 ppm expansion occurs in aluminum with a 20°C change in temperature.
[26-SEP-12] At CERN, our collaborators obtain an almost identical error map from the same images as we did above, as you can see here. We used the same analysis (no smoothing, no merging, analysis_enable = 1) and threshold (analysis_threshold = "20 #").
[19-NOV-12] We place sensor C0582 on our test stand in Boston. We have a short length of black Vectran® wire held tight by springs. We perform a series of experiments designed to test the relative accuracy of the calibration. We start by taking ten measurements without touching the sensor. We take ten measurements each time removing and replacing the cover. We take ten measurements removing the entire sensor and replacing it on the three balls. We place seven calibrated sensors (Q0129, P0203, P0223, P0225, C0582, C0583, C0584, C0585) on the mount one after the other and took measurements for each. We used the WPS_5.tcl Acquisifier script to translate image measurements to wire position. The calibration of C0584 was off by over 100 μm, and so removed it from our test. The table below summarizes our observations.
| Experiment | σ(x) (μm) | σ(y) (μm) |
|---|---|---|
| Repeat Measurement Without Touching | 0.5 | 0.2 |
| Repeat With Cover Replacement | 0.3 | 0.2 |
| Repeat with Re-Mounting of Sensor | 0.4 | 0.3 |
| Replacing One Sensor With Another | 5.6 | 3.2 |
We had to take great care not to touch the wire when replacing the cover or the sensor. If we touched it, it would move by tens of microns. We had to be sure to hold down the sensor with two fingers on either side of the mounting screw to make sure it was seated properly. Having practiced the procedure, we were able to obtain the above results. The mounting accuracy appears to be better than 1 μm. The cover appears to have little effect upon the measured wire position.
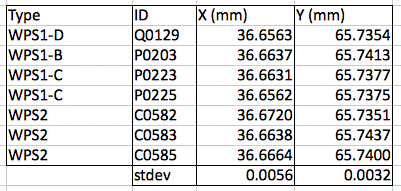
We conclude that the calibration resolution for replacement of one sensor with another is of order 6 μm in x and 3 μm in y. We do not have enough WPS2s to estimate the replacement error of WPS2s only.
[10-MAY-13] We rebuild C0584 with an anodized aluminum base supplied by CERN. In place of the flat depression, this base has a flat pin inserted in a hole while cold, so as to make a press fit with the base metal. We expand the calibration process to include more points over a wider range, and obtain the following plot of errors. The standard deviation of the error is 2.0 μm.

The micrometer attached to the vertical stage of our calibration stand does not give vertical movement directly. When we move the micrometer 10 mm, the stage goes up by only 7 mm. Our new calibration procedure was supposed to span a 10 mm × 10 mm area, but instead spans only 7 mm × 10 mm.
[05-JUN-13] The micrometer stage failed after the second calibration and we re-built the calibration procedure using a new probe. The camera calibration errors for the subsequent WPS2s average around 0.9 μm, as compared to 1.8 μm for the WPS1s (Versions B, C, and D). Thus we see a factor of two improvement with respect to the WPS1, and we suspect that this is due to improvement in the calibration accuracy, not the fundamental accuracy of the instrument. The C0584 and C0585 calibrations have error 4.4 μm and 3.1 μm respectively, but they are measured over a larger field of view. The calibration spans 12 mm in x and 8 mm in y. We calibrate again with a 12 mm × 8 mm grid. See the Dynamic Range section for details. Sensor calibration error is 4.4 μm for C0584 and 3.1 μm for C0585 over the entire range.
[10-JUN-13] We now have two calibrations of C0585 with our 12 mm × 8 mm grid. When we apply the C0585_B calibration constants to the C0585_B pin positions, we get a sensor calibration error of 3.1 μm rms. Figure C0585_B_Errors.gif is a map of the sensor calibration errors ×100. When we apply the C0585_C calibration constants to the C0585_C pin positions, we get a sensor calibration error of 2.9 μm rms. Figure C0585_C_Errors.gif is a map of the sensor calibration errors ×100. The difference between the two error maps is less than 1 μm rms, which suggests that the calibration errors are a function of the C0584 optics. When we apply the B constants to the C positions we get 4.1 μm sensor calibration error, and when we do the converse, we also get 4.1 μm.
We have two calibrations of C0584 with our 12 mm × 8 mm grid. When we apply the C0584_C calibration constants to the C0584_C pin positions, we get a sensor calibration error of 4.4 μm rms. Figure C0584_C_Errors.gif is a map of the sensor calibration errors ×100. When we apply the C0584_D calibration constants to the C0584_D pin positions, we get a sensor calibration error of 2.2 μm rms. Figure C0584_D_Errors.gif is a map of the sensor calibration errors ×100. The difference between the two error maps is more than 5 μm in several places, especially in the lower right points. We suspect that these points were imperfect in C0584_C because when we remove them, the C0584_C calibration error drops to 3.3 μm.
[25-JUL-13] Patrick Bestmann at CERN measures the relative error of C0584 and C0585 with a black Vectran® wire. The plot below gives the error he measured in a 10 mm × 10 mm field of view. He has zeroed the error on the lower-left corner for the relative test.
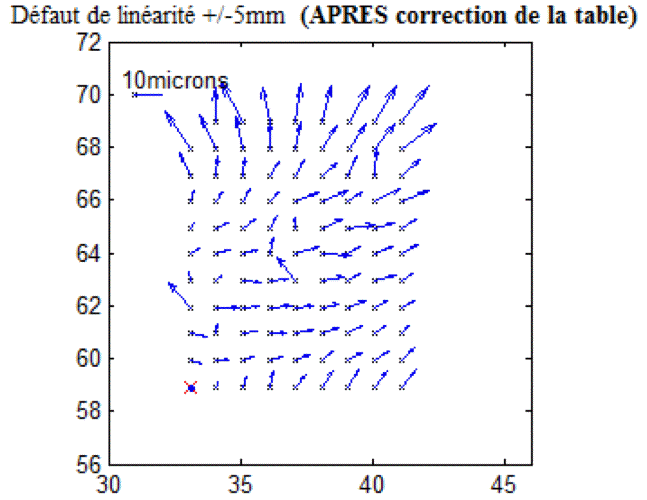
We do not understand why Patrick's errors are so much larger than the ones we measure in the overlap between his measurement range and our calibration range, but we are looking into the question.
[27-OCT-15] We have twelve assembled WPS2-B without covers, awaiting calibration, shown here. Ten of these are to fulfill and order placed by CERN.
[01-DEC-15] We have 12 completed WPS2-Bs. We calibrate Q0218 over a region 18 mm in x and 8 mm in y. See Q0218 for pin locations and errors. Sensor calibration error is 3.9 μm, which is consistent with the sensor calibration error of our WPS2-A devices over a 12 mm × 8 mm region.
[03-DEC-15] We calibrate Q0216 (4.6 μm), Q0217 (4.6 μm), Q0219 (3.3 μm), Q0221 (4.0 μm), and Q0222 (1.9 μm).
[07-DEC-15] We calibrate Q0220 (2.4 μm), Q0223 (4.1 μm), Q0224 (2.8 μm), Q0225 (2.8 μm), and Q0227 (2.7 μm). We have two pin positions with the pin touching the edge of the field of view in our Q0226_A calibration, so we calibrate with only sixteen pin positions, Q0226 (5.0 μm).
[08-DEC-15] We will ship Q0217-Q0225, and Q0227 to CERN, to make a total of 10. We keep back Q0216, but we accept its calibration. We keep back Q0226 but reject its calibration. We re-align the bottom camera on Q0226, and we intend to re-calibrate.
[26-APR-16] CERN has 10 of WPS2-B. One of them, Q0224, they send it back to us, saying it is faulty. One of the flex cables is unplugged. When we restore the cable, Q0224 works perfectly. We have two spare WPS2-Bs here at OSI on the shelf. At CERN, they check linearity and replacement error, as they describe in their Short Report oWPS. For their nine sensors, the standard deviation of the difference between their two-dimensional stage and the WPS2-B in x or y is between 1.1 and 3.4 μm. Assuming the x and y errors are independent, the difference in xy appears to be 3-5 μm rms. When CERN mounts the same sensor repeatedly, their standard deviation in position measurement is of order 1 μm, according to an e-mail. When they exchange sensors, the standard deviation is around 3 μm, if we ignore two outliers Q0222 and Q0218, which produce errors of +8 μm and −10 μm in x.
[20-JUN-16] We have Q0224 back from CERN again, returned for re-calibration, following these measurements showing that its measurements were offset by 20 μm. We obtain a new calibration, Q0224_B. The table below shows the original and new calibration constants for the two cameras on Q0224.
--------------------------------------------------------------------------------------------------
                  pivot (mm)              sensor (mm)            rot (mrad)         pivot-  error
Camera       x      y        z       x      y        z         x        y       z   ccd (mm) (um)
--------------------------------------------------------------------------------------------------
Q0224_A_1 -3.1980 88.0950 -5.0056 -11.9307 93.4184 -5.0737 -1571.533 -3.859 -514.367 10.228  2.5
Q0224_B_1 -3.1788 88.0793 -4.7190 -11.9091 93.3991 -4.7437 -1571.332 -3.309 -517.308 10.223  1.5
Q0224_A_2 -3.2454 39.0263 -5.0504 -11.8872 33.8536 -5.1274  1576.393  3.672  510.063 10.072  1.1
Q0224_B_2 -3.2386 39.0490 -4.8937 -11.8836 33.8782 -4.9505  1576.488  1.762  513.098 10.074  1.6
--------------------------------------------------------------------------------------------------
When we use the Q0224_A calibration constants with the Q0224_A wire positions, we get sensor calibration error 2.8 μm. The Q0224_A calibration constants applied to the Q0224_B measurements produce sensor calibration error 6.4 μm. The Q0224_B calibration constants applied to the Q0224_B measurements give us a sensor calibration error of 2.4 μm rms. Figure Q0224_B_Errors_x100 shows the sensor calibration error across the calibration range. When applied to the Q0224_A measurements, the Q0224_B calibration constants give a sensor calibration error of 6.9 μm.
The two calibration are inconsistent, which suggests that some movement of the cameras took place between the calibrations. The maximum disagreement between the calibrations is only 10 μm in the calibration range. So we are not confident we have discovered the source of the 20-μm offset observed at CERN.
[19-SEP-18] We want to make 1500 m of wire suitable for use with our WPS2-B sensors. We start with the same non-conducting, three-stranded, white Vectran® wire chosen by our collaborators at CERN. We can buy 20 kg of this wire for $5000, which will be roughly 100 km of wire. The white wire shows up well in our red-light illumination, so we have no need to change its color. But we must give the wire electrical conductivity or else it will be possible for electrostatic charge to build up on the wire, causing the wire to move by electrostatic attraction. Such movement was observed at SLAC when using a monofilament fishing line. The wires moved by up to 5 mm. Back in 2015, CERN addressed the problem of conducting wire by sputtering silver onto the three strands, then winding the strands together. The resulting wire had resistance roughly 1 kOhm/m. We have a sample of this silver-coated wire we received several years ago from CERN. We measure its resistance. No matter how we try to make contact with the wire, twist it, or stretch it, the resistance is >10 GΩ/cm. So far as we can tell, it is insulating.
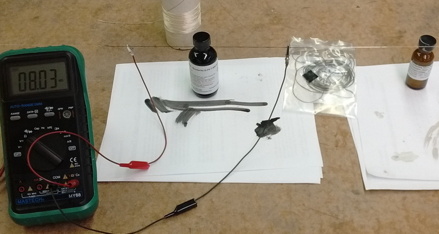
We impregnate white wire with graphite and silver paint. After trying, and before any agitation of the wire, the graphite gives resistance of less than 1 kΩ/cm and the silver wire less than 10 Ω/cm. After we rub, bend, and twist the wire, it becomes insulating. We stretch a wire with a 0.5-k load and coat it with graphite and silver using a sponge. We squeeze the sponge around the wire. The sponge leaves no drips behind. After half an hour we rub between our fingers to remove any excess graphite or silver. The silver-coated section is insulating. The graphite-coated section has resistance 8 MΩ over 30 cm, or 250 kΩ/cm. We coil up and uncoil the graphite-coated section and take a photograph with a microscope.

We return to the silver-coated wire from CERN. When we load the wire with 2 kg we are able to find 5-cm sections with resistance 1 GΩ. We find a 1-cm section that shows resistance >10 GΩ when slack, dropping to 1 kΩ when loaded with 2 kg. We move one alligator clip 1 cm farther along the wire and the 2-cm length has resistance >10 GΩ for 0-4 kg of load. The resistance of our 20 cm length of graphite-coated wire remains roughly 100 MΩ regardless of load.
[21-SEP-18] We measure the resistance of a 20-cm length of graphite-impregnated Vectran® wire. We first place one alligator clip on the left, and move the other to the right. Then we place one clip on the right, and move the other to the left.
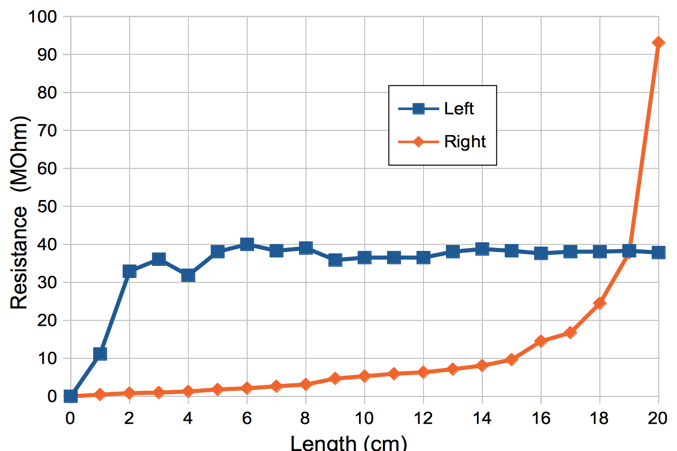
The resistance is the sum of the contact resistance of each clip on the wire, and the resistance of the impregnated wire itself. The right-side plot suggests a wire resistance of 670 kΩ/cm for length 0-15 cm. The contact resistance is 30 MΩ or 90 MΩ at the left end of the wire, where the impregnation is fading. We rub the wire twenty times between our finger nails. Its resistance rises to 200 MΩ.
We coat 120 cm of wire with a sponge soaked in graphite paint. We fold the sponge over around the wire and slide the sponge along the wire from one end to the other two times. The wire is stretched by 0.5-kg weights. The entire 120 cm is coated in under ten seconds. The paint is dry to the touch in a few minutes. After half an hour, we measure resistance versus distance.
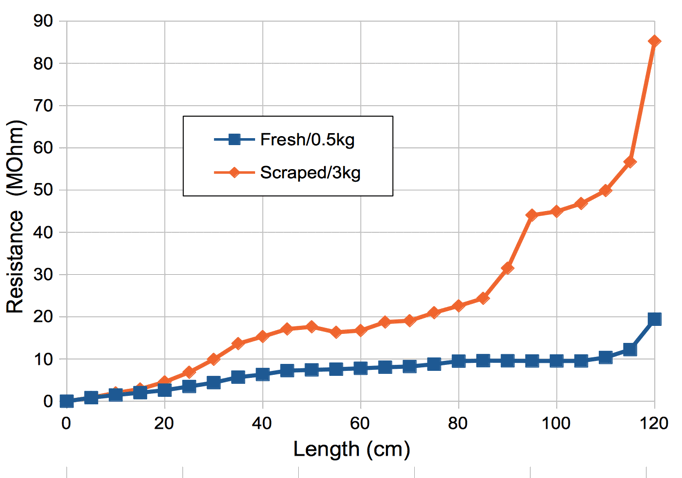
We scrape the wire six times along its entire length with our fingernails. We increase the tension to 3.0 kg. We repeat our measurement. The resistance of the full 120 cm is 20 MΩ before and 85 MΩ after. We obtain the following images of bare and graphite-coated wire with a WPS2-B.
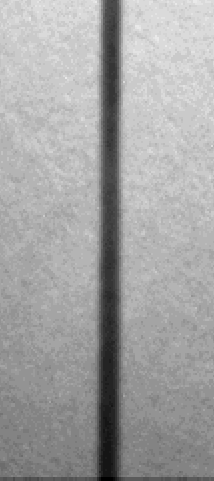

The image contrast is better for the graphite wire, which is black. The bare wire is white. We note that the width of the graphite-coated wire varies along its length. We use the following Toolmaker script to divide each of the above wire images into 22 horizontal strips, each 10 pixels high, in which we calculate the position of the left and right edges of the wire on the image sensor.
set im [LWDAQ_read_image_file [LWDAQ_get_file_name]]
catch {image destroy wps}
image create photo wps
label $f.l -image wps
pack $f.l
for {set top 2} {$top <= 230} {set top [expr $top + 10]} {
	lwdaq_image_manipulate $im none -bottom [expr $top + 10] -top $top
	set wps [lwdaq_wps $im \
		-num_wires 1 \
		-pixel_size_um 10 \
		-threshold "30 # 10" \
		-reference_um [expr $top + 5] \
		-pre_smooth 1 \
		-merge 1]
	LWDAQ_print $t "$top $wps"
}
lwdaq_image_destroy $im
We fit a straight line to the center of the wire position in each strip versus row number. The plot below shows the residuals from this straight line fit versus row number, as well as the image width versus row number.
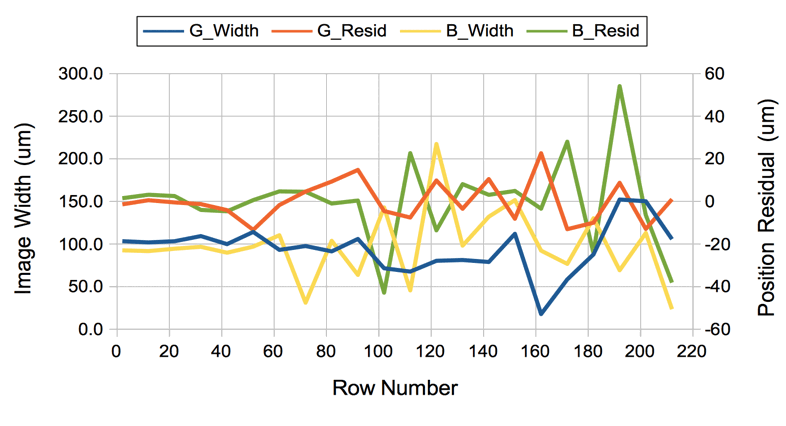
The standard deviation of the residuals is 20-μm for the bare wire and 10 μm for the graphite-impregnated wire. The width measurement is poorly-behaved in these thin strips. In the bare-wire image the width ranges from 20-200 μm, and in the graphite-impregnated image the width varies from 60-150 μm.
We wind 100-cm of graphite-impregnated line into a 1-cm coil and place it on our scale. It weighs 176 mg. Afterwards, we uncoil and find that it no longer conducts electricity from one end to the other. A 100-cm length of bare line weighs 152 mg, and silver-coated line from CERN weighs 158 mg.
[24-SEP-18] We consider how a linear increase in line density from one end of a span to the other will disturb the parabolic shape of the line that we expect for a line of uniform density.
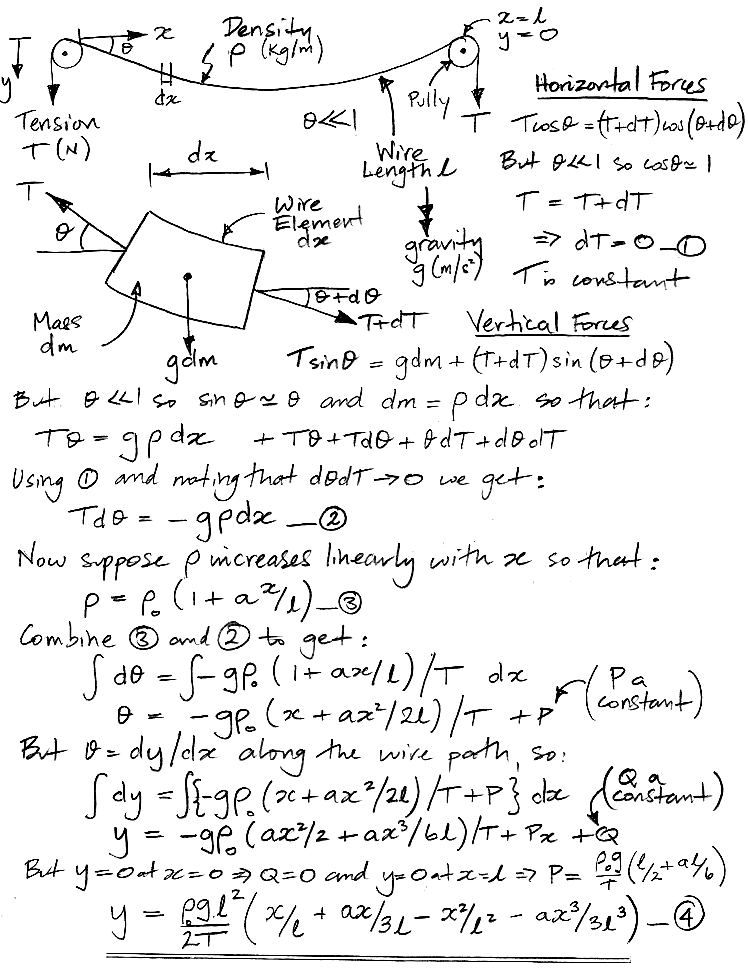
Suppose we string three lines of the same length, each with the same density at the center of the span, but with differing total variation from one end to the other. We use the above result to determine how the shape of the line changes as we increase the variation in density.
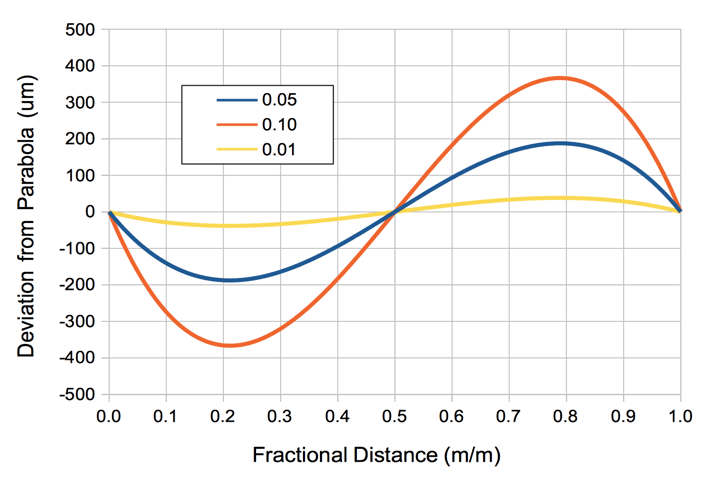
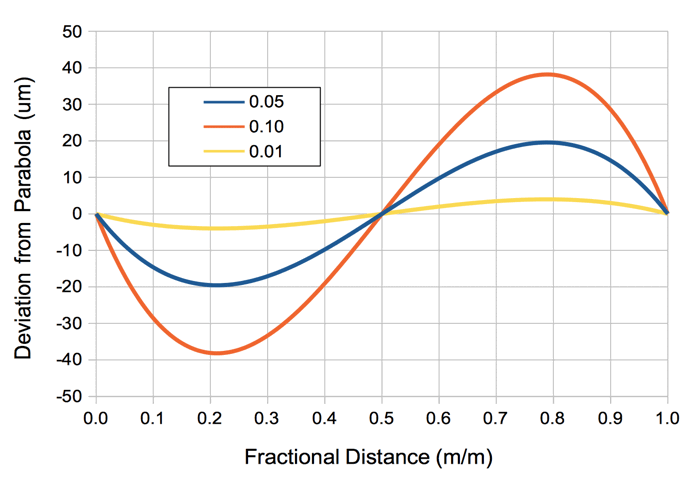
In order for the line shape to be within ±5 μm of parabolic, its density variation must be <0.25%. We have no reason to believe that the line, as supplied by the manufacturer, has density variation <0.25%. Assuming the line density perfectly uniform, we consider the effect of our graphite impregnation. Two coats of graphite paint add 24 mg/m to the line density. If we can control the density of this coat to ±2.4 mg, the maximum deviation deviation from parabolic will be ±100 μm. Applying more tension to the line and keeping it shorter gives us a dramatic reduction in the deviation from parabolic.
According to our table of wire properties, the breaking strain of Vectran® line is 2.7 GPa and its bulk density is 1.1 g/cm3. Our bare line's linear density is 0.15 g/m, so it's cross section is 1.4×10⁻⁷ m2 and its breaking strain 370 N. If we load the bare line to 370 N over a 100-m span, the sag will be 5.1 mm (according to our derivation above, and also our table).
[25-SEP-18] We purchase some braided fishing line made of Dyneema® fiber, which compares well to the Vectran® fiber. Its density is 0.98 g/cm3 and strength 3.4 GPa (see Table 1). The sag of a 100-m span loaded to its breaking strain will be only 3.6 mm.
[01-OCT-18] We apply Carbon Black acrylic paint to white 68-kg (150-lb) strength, braided Dyneema fishing line. The paint soaks all the way into the braid, so that a cross-sectional cut through the fiber is entirely black. The paint dries in ten minutes and if flexible. One day later, we measure the resistance of 20 cm of painted line and find it to be >100 GΩ. This paint does not conduct electricity.
We impregnate 1 m of the same 68-kg braided line with our original graphite paint. We wait ten minutes and take the following photograph of the line suspended over a piece of paper, but under no tension.
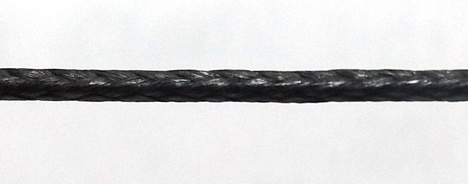
The braided line does not unwind when it is loose. The graphite paint soaks right into the braid to the center. The resistance is 1 MΩ for the 1-m length. We coil the 1-m and tie into a ball to measure its mass. We get 357 mg. We cut ten 1-m lengths of uncoated line and obtain average weight 355 mg with standard deviation 1.8%. We cut ten 10-m lengths of uncoated line and obtain average 3539 mg with standard deviation 1.0%. The slope of weight with distance along the original 100-m section is 1.3%, but not statistically significant. We uncoil our graphite-impregnated braid. Its resistance is now >100 GΩ.
[19-OCT-18] We have a 2-m span of 68-kg braided line running over two pulleys at either end and loaded with 1 kg that we can increase to 20 kg. We impregnate in place with graphite paint with a sponge wrapped around the line, passing twice along the span. After three days, the resistance of the entire span is 1.0 MΩ. We increase the tension to 20 kg weight and the resistance of the span increases to 1.5 MΩ. After six days it is 1.0 MΩ. We run a paper towel up and down the line six times and remove graphite dust. The resistance of the entire span is now >4 MΩ. We slide our two resistance probes along the line, separated by 30 cm, pressing one down on the line and the pulling the other up, so as to maintain a firm contact. The resistance of the 30-cm segment varies from 1.4 MΩ to 3.5 MΩ along the 2-m span.


We apply a 25-kg load and measure the resistance of a 30-cm section. We get 2.5 MΩ. We relax tension and get 1.5 MΩ.
[04-DEC-18] Our 2-m section of stretched line we have removed from the pulleys, set aside, and restored to the pulleys three times. Its total resistance is now >40 GΩ, which we measure with a 10-V power supply and a multimeter. We replace the line and coat with graphite while under 1-kg load. After two hours, resistance of 2-m span is 1.4 MΩ. We increase tension to 25 kg and resistance increases to 2.5 MΩ. As we repeatedly cycle the load from 1 kg to 25 kg, the resistance at 1 kg is increasing. The wire snaps at one of our knots. We restore the line. Under no load its resistance is 16 MΩ. We impregnate the ends of the line and place them over the pulleys. We connect our voltmeter to the pulleys. Resistance is 7.5 MΩ.
[18-DEC-18] Resistance between the pulleys that support our 2-m stretched line is 6.0 MΩ. We apply roughly 15 kg load by hand to the wire, then relax, twenty times. Resistance of the wire is no 10 MΩ.
[28-DEC-18] Resistance between pulleys is 9 MΩ. We increase tension until the wire breaks at one of the knots beyond a pulley. The wire springs away and lands on the floor. We pick up, tie the load on again, and lay over the pulleys. Resistance between pulleys is no >100 GΩ. By moving our probes along the wire, we find one 10-mm section with resistance >100 GΩ, 20 cm from one end. The remaining 180 cm to the pulley has resistance 50 MΩ.
[15-MAR-19] We coat 18 m of 14-kg (30-lb) Dyneema braided line and coat once with water-based carbon conducting paint. We are pulling the line off its 300-m spool with a larger hand-held spool, in which we have secured a foam layer as a base for the line. As the line moves six meters from its origin, we coat with paint using a sponge. We allow to dry on the spool for 30 min then unwind around the columns in our office. There are four breaks in the conductive coating. Three are obvious because the wire is white for a short distance. One is not obvious. We re-coat the entire 18 m except where it wraps around the columns. Resistance is now 7 MΩ.
We coat 6 m of 36-kg (80-lb) Dyneema braided line, hanging under its own weight. We apply the paint with a sponge going over the entire length three times. We allow to dry for twenty minutes. We measure resistance of the entire length to obtain resistivity in MΩ/m. We wind up the line onto our spool, then let it out again, and measure resistivity again. We repeat until we accidentally snag the line, and ruin the coating. We re-coat the damaged section and start again after ten minutes. We deliberately damage the coating by kinking it after another eleven re-windings, re-coat, and start again after five minutes.
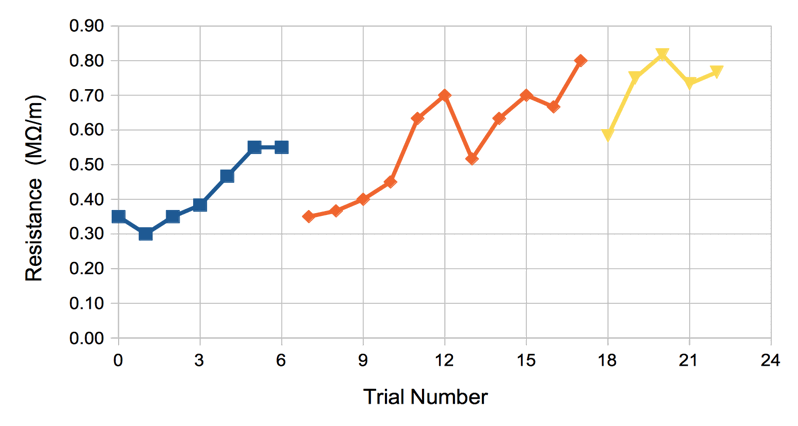
We observe that the resistance of the paint is greater than we can measure when it is first applied, even if the application is over a few centimeters. After five minutes, the resistance drops to close to its final value, and the paint is dry to the touch.
[02-APR-19] We hang sixteen meters of 36-kg Dyneema line and treat with carbon paint. After a few minutes, the resistance of the entire span is 5 MΩ. The diameter of the treated wire when measured by calipers, which apply some pressure to the circumference, is around 0.56 mm, and that of the untreated wire is around 0.53 mm. The treated wire is stiffer than the untreated. We do no know how much the untreated wire compresses when we measure its diameter with the calipers. We reel the sixteen meters onto our spool and coat the next sixteen meters. Resistance is 30 MΩ after a minute, 7 MΩ after five minutes. We hang sixteen meters of 14-kg Dyneema line and treat. Resistance is 7 MΩ, diameter of treated wire is 0.34 mm, and of untreated wire is 0.32 mm. We order four 1000-m spools of 18-kg Dyneema line, nominal diameter 0.32 mm.
[10-APR-19] We glued the lenses into twenty lens holders with the plane side facing the aperture rather than the convex side. We address once again how aberration is affected by the orientation of the lens, see Aberration. The error due to aberration with the flat side of the lens facing the aperture should be a 5-μm rms cubic function, known to within ±1 μm, which we can in theory correct without calibration or measurement. We resolve to calibrate several of our new WPS2 devices..
[11-APR-19] We have WPS2-B with both lenses glued upside down. Sensor calibration errors are 5.8 μm rms over a 16 mm × 8 mm diamond-shaped range. Camera calibration errors are 4.1 μm rms camera one and 2.2 μm rms camera two. The ccd-pivot distance has increased from 10 mm to 13 mm, for reasons we do not yet understand, and this leads to an unacceptable loss of dynamic range. We start knocking apart the cameras, extracting the lenses, and grinding down the flanges on the lens holders where they have been bent by impact.
[14-APR-19] We add a cubic aberration correction to our wps image coordinate transform routines. See the routines. See wps_from_image_point and image_from_wps_point in wps.pas. Our cubic correction applies only after wire-finding. We do not apply the correction during wire-finding, which means we do not account for the bending of a wire shadow by aberration before fitting a straight line to the shadow. Our calculations suggest that the slope of this line will not change as a result of the bend in the shadow, and that the intercept will follow a cubic aberration that is a weighted sum of the aberration at other y coordinates. When we add a cubic aberration correction to our calibration fit, the fit usually fails to converge. When it does converge, our cubic aberration constant is of order 0.0003, and we see no improvement in the sensor calibration error. In our wps.pas we disable the correction with a constant, and comment out a few lines in the simplex fitting routine. We use the new wps_camera_error routine instead of wps_ray_error to obtain the camera calibration error. The new routine checks the calibration at two z-planes 0 mm and −10 mm. The old routine checked at two locations with different values of z, but not always the same values of z. The old routine supported using wire edges as well as center-lines, but the new routine supports only center-lines. These new routines, and the aberration correction code, are available in LWDAQ 8.7.8.
[16-APR-19] We revisit our cubic aberration correction and find that the fit was suffering from the fact that we had not scaled the aberration correctly. A step in parameter space of a length 0.001 is typical for the fit, being one micron or one milliradian. But in the cubic correction, a significan distortion was of order 0.001 already. We now have the correction scaled by a factor of one thousand. The fit now succeeds most of the time, including on a camera it previously never converged upon. The camera calibration errors are now 1.0 and 2.2 μm for Q0216, and the sensor calibration is 2.5 μm. When we turn off the aberration, the camera calibration errors are around 1.0 and 2.3 μm and sensor calibration is 1.4 μm. We do the same for the calibration D0629_A, which is the original build of D0629 with lenses upside down, and aberration parameter ten times higher than for Q0126. Camera calibration errors are 1 μm, down from up to 4 μm without aberration correction. But Sensor calibration error is 27 μm, up from 5.8 μm.
[18-APR-19] We calibrate sensor D0629 and obtain 2.5 and 2.2 μm camera calibration errors, and 3.8 μm sensor calibration error. Our new grid of calibration points can be seen in this map.
[23-APR-19] We now have the calculation of WPS calibration constants embedded in wps.pas, in the routine wps_calibrate, which is available at the LWDAQ command line with the library command lwdaq wps_calibrate. Our Calibrate.tcl program loads the CMM and WPS text files produced by our calibration procedure, calls the wps calibration routines, produces the calibration constants, and calculates the sensor calibration errors for plotting.
[26-APR-19] We discover that the weight of the illuminator we use in our calibration procedure is causing the calibration pin to move down by approximately 8 μm and horizontally by 7 μm. Because we measure the pin position with the CMM before putting the illuminator in place, this movement introduces an error in the calibration directly. If the movement is always the same, we could hope to adjust the CMM measurements of the pin location by this distance and so correct our existing fifteen calibrations. We replace the illuminator with a piece of paper. Now we do not have to touch the pin at all after measuring its position with the CMM. We re-calibrate D0636, for which we have a fine calibration with the illuminator. Now we have a fine calibration with the paper screen. We offset the pin positions of the original illuminator calibration, D0636_A, in WPS coordinates by −7 μm in x and −8 μm in x, as is possible in our Calibrate.tcl script. We calculate calibration constants. We apply these D0636_A calibration constants to the pin locations and image positions recorded for calibration D0636_B. We obtain this plot of cross-check errors. The average error is zero by our choice of displacement. The standard deviation of error is 7 μm. The same correction leads to similar results with sensors D0660 and D0663. We note a We now suspect the 15 μm disagreement between the Q0216_A and Q0216_C. The We are going to try to calibrate all sensors with the paper screen, even though this means re-calibrating fifteen sensors.
[27-APR-19] Calibration D0648_B contains one image where the wire is so close to the edge of the screen that half of it is missing. We remove this one point from the calibration. We have eleven new WPS2-B calibrated with the paper screen. We use our optical center calculator to find the WPS coordinates of their optical centers. The average center is (39.4 mm, 63.4 mm) with standard deviation (0.19 mm, 0.15 mm).
[29-APR-19] We spool and unspool several 14-m lengths of 18-kg (40-lb) braided line impregnated with carbon paint earlier in the day. After the first cycle, we see breaks in the impregnation: it is not so much an impregnation as a coating. When we flex the line, the coating cracks and comes off. This braided line, and the 14-kg (30-lb) braided line are smooth on the outside when stretched on our impregnation stand. The 36-kg (80-lb) line, however, has a pronounced braided texture on the outside, and draws the carbon black paint well inside for a reliable impregnation. We have abandoned the 18-kg line for use with our wire position sensor, and will instead be using the 36-kg line.
[05-MAY-19] We have Job 2086 packed up in five boxes and ready to ship. The contents before packing, last week, are shown below. Calibration constants of all thirty WPS2-B are listed in our calibration database.

[07-MAY-19] We are preparing a package to send to our employee in China, for the assistance of NSRL. We have a "wire repair kit", a "cable-making kit", and a "WPS mounting kit".
[08-DEC-22] We have ten meters of our 36-kg (80-lb) line coated with Singularity Black LT by NanoLab. We cut off a 30-cm section. Its resistance is 60 kΩ. We twist the line, coil it, and uncoil it vigorously. Its resistance is 62 kΩ. Visual inspection shows no change in the black coating as a result of our efforts.
